Setting up a lovely new project
I’ve been doing two things recently that make me want to improve my workflow: starting new projects, and trying to revive old ones.
I remember back in the day when I first started using R instead of point-and-click stuff in SPSS or excel, and I was SO PROUD that my work was all in code, super reproducible. I also remember when I read my first book all by myself, and I was so proud then, too. How standards change, eh? My ability to read Amelia Bedelia cover to cover no longer seems as impressive, and – not unlike the work of that bumbling parlor maid – my old code now looks more like a series of misunderstandings and cryptic jokes than clean, reproducible analyses.
Looking back through my old projects and (gasp!) needing to share old code with new collaborators has brought to light some common problems:
1) Where even is that R script?
2) This code totally worked the last time I used it, and it simply doesn’t now.
3) Is this the code I used for that conference poster, or was it another version? Wasn’t there some code in here for sequence plots? Where did that go?
In an attempt to solve these problems* for Future Rosie, I’m setting up my new projects much better. We’ve talked about tools for workflow and reproducible code on this blog before, and of course there’s lots of tutorials for this online. This is just my version.
* Note that the “where even is that r script” problem is not really solved by nifty reproducible code tools. You just need to pick a naming convention and file organization system and then effing stick to it (I’m looking at you, Past Rosie!).
Setting up a pretty project
I’m using R studio and git. These are the important pieces for my own workflow (solving problems 2 and 3 above). I also use github to host my code, so it’s easy to share, etc. It’s also a nice way to keep track of my to-do list for each project (via “issues”). You don’t need to set up a github account to take advantage of git version control, though, and if you start a git project in Rstudio without associating it with a github account, you can always add it later. So definitely set up git, and connect it to github if you want.
Install stuff
If you haven’t already, you’ll need to install Rstudio (https://www.rstudio.com/products/rstudio/download/) and git (http://git-scm.com/downloads).
Set up your project
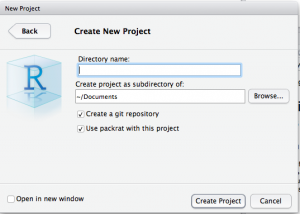
Open Rstudio and click File>New Project… Then select “start new directory” and then “empty project.” Type in the name of the project (this will be the folder name). Select “create a git repository” to use version control, and select “use packrat* with this project” to save all of the useful information about which versions of every package you need.
*”What is packrat,” you ask? Excellent question. It keeps track of which versions of all of your R packages are used for a project, so you can run old code with old package versions if you need to. Read about it and see if you want to use it.
Using git
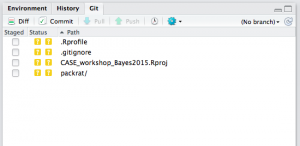
In your new, empty project, you’ll notice a couple things: There’s a new tab by Environment and History
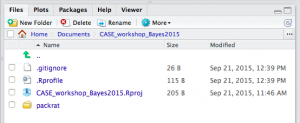
and there are some automatically generated files hanging out in your directory.
When you use git for version control, you save “commits”, which are like snapshots of your work. I recommend you commit every time you’re done adding something or making some change to your code. You’ll save a short message with each commit describing what you’ve done, so I recommend you commit every time you feel like you could describe your work with a pithy little message. For example, “added code for histograms of age and PPVT” is good, as is “fixed typos in intro paragraph”, “deleted sequence plots”, or “switched dataframe transformations to tidyr functions”. I like to wait to commit until I have working code, not before (so something like “trying to get LDA to work”, “still trying to get LDA to work” etc. are probably not good commits). Your commits will be the history of your project, and you’ll be able to click on each commit to see what your code looked like then. Committing is not the same as saving – I recommend you save compulsively, like every second, whether you’ve done anything worthwhile or not. Saving will update the file(s) on your computer (for example, the .r file in your working directory). Committing is a way to preserve snapshots of your project at useful or interesting points, so you (or someone else) can go back and look at it later.
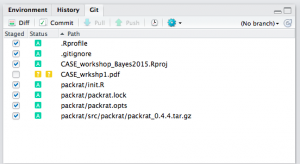
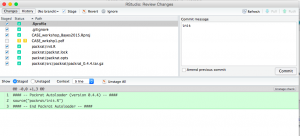
Your first commit is usually just to start the project. I generally just include the message “init” for my first commit. Committing in Rstudio is a breeze. 🙂 Just click the little boxes next to each of the files you want to commit, and then click “commit”
This opens the git window in Rstudio, where you type your commit message. The bottom shows you any changes, line by line, in your files from the previous commit (green means lines added – it’s all green now since these are new files being added). This is great for helping you remember what you want to write in your message. Neat, huh?
Then hit “commit”! Bam. 🙂 You can also use this window to browse through your previous commits, which is nice when you’re looking for an older version of something or you want to see how or when your code changed.
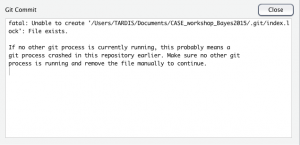
Note: Sometimes I get the following error message when I try to commit:
I’m not sure why. But it’s easy to fix: Close this popup, then hit “refresh” on the git window, then hit “commit” again. That usually works for me.
When you’re done checking out your git stuff, just close the git window and go back to regular Rstudio land.
Which files to commit?
Note that I committed several files above:
- the .Rprofile (you can use this to save options and preferences and stuff),
- .gitignore (more on this below)
- .Rproj file (roughly, this one saves my current state in Rstudio, including history, any variables I’ve made, packages loaded, dataframes open, etc. You may or may not want to version control this guy, depending on what you’re doing)
- all the packrat stuff (you can read about packrat here)
- If I had text files I was working on for this project (for me, they’re usually .r, .md, or .rmd files) I would have committed those, too.
The .gitignore file is important. It’s a list of stuff you DON’T want version controlled. For example, if you have some other stuff in this directory (slides from a conference presentation of this project, stimuli from the study, data, etc.) you can tell git to not bother version-controlling that stuff. Version control works best on plain text files (.txt, .r, .md, .rmd, .tex, .html, .csv, etc.), so I don’t recommend you try to version control other stuff (any mircosoft office files, images, movies, sound files, etc.).
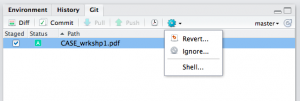
I have an example pdf in my directory, so I’m going to add that to my .gitignore list. Click on it, then click the settings wheel, and click “ignore”. This will add it to the .gitignore list. It’s also possible to edit the .gitignore list yourself (it’s just a text file, so you can type right in it).
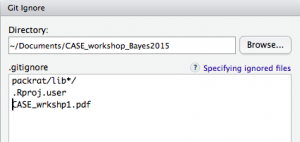
You’ll see that there are a couple things automatically added to the .gitignore list for you when you start a project in Rstudio this way, and now my .pdf file is added to that list! Joy.
When you look at your git window, you’ll notice the .gitignore file is there:
That’s because it’s been changed, and the change has not yet been committed. You can click the box next to it, then hit “commit” to commit that change now (your message might be something like “added old .pdf from previous workshop to .gitignore”).
Note that if you use a Mac, you might also see a .DS_Store file in your directory. This is just your computer keeping track of folder preferences, etc. You most likely don’t need to version control this, so add it to your .gitignore list as well.
Want to combine this awesomeness with a github repo?
Damn straight you do. You can use SSH to connect your RStudio project git stuff to your remote github repository. For example, here’s a repo of mine that connects to an RStudio project I have stored on my laptop: https://github.com/rosemm/rexamples This means that I have all of the lovely version control stuff going on in RStudio when I work on this code AND I can make all of that publicly available so cool, smart people like John can contribute to my code! It’s also a handy way to share code with others – I can just send them a link to my github repo, and they have everything there at their fingertips (and if I update it, they’ll always have access to the most recent version, as well as all of the old commits in case they want an old version).
If you’re new to github, check out the extremely excellent materials available in Jenny Bryan‘s course at UBC: http://stat545.com/git00_index.html. And here is a much quicker and less comprehensive resource: http://www.r-bloggers.com/rstudio-and-github/.
