Helpful Perspective Tips: PHOTOSHOP
To begin make sure you set up your file the following way:
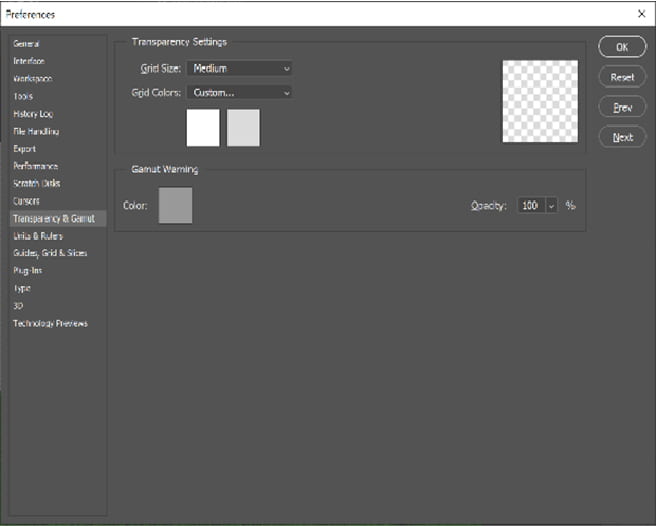
• Go to edit > preferences > transparency and gamut and establish a checkerboard pattern for transparency. This will allow white backgrounds and transparent backgrounds to distinguish themselves in your collage. Remember that the checkerboard won’t show up when exported, it is just to help you visualize a blank canvas
• Turn off quick select for the time-being. When you have a large file with many components, it will come in handy, but for now, it will be a nuisance.
• Establish the proper tool bar
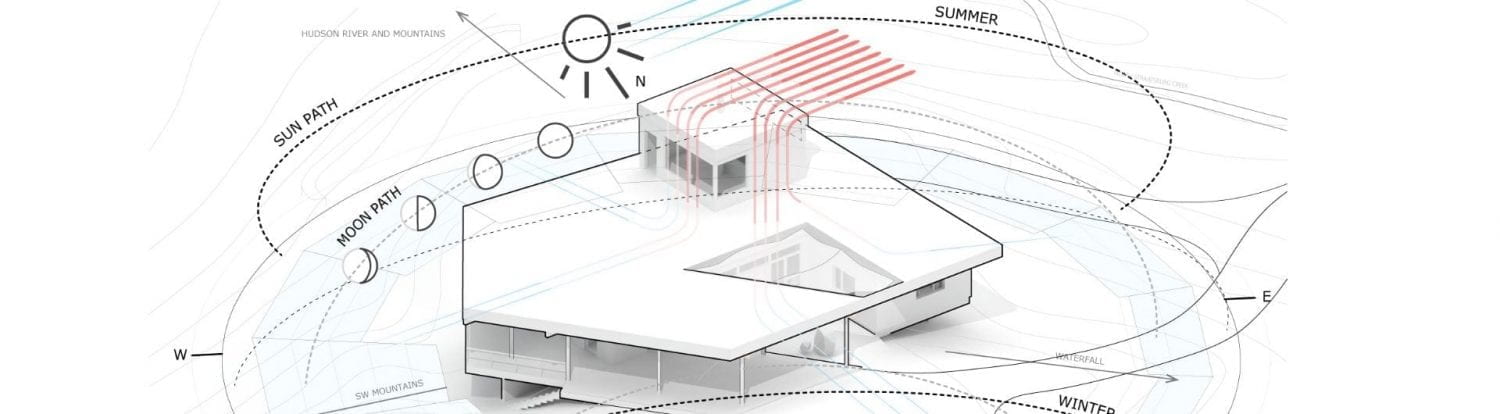
1) Establish horizon line and vanishing point(s)
a. Use ctrl + R to activate ruler (should appear bordering your work plane)
b. Right click on the ruler and select which unit of measurement you prefer
c. Click + drag from the ruler to the desired spot from the x-axis on top
i. Reminder to keep this low on the work plane to simulate human height and not a magical floating view
ii. Use ctrl + : to toggle on and off
d. Open a new layer and place two circles on the horizon line as vanishing points
i. The new layer will allow you to toggle the vanishing point on and off
2) Ground
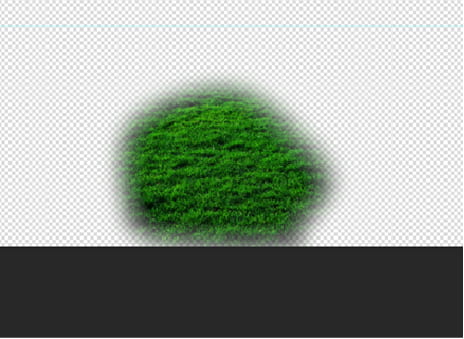
a. Download a .png of grass, preferably in perspective, that has some volume to it.
b. Remember that grass is layered and not a flat plane
c. Start with a small portion of the grass by using your eraser tool with a highly feathered edge to soften.
i. You might want to also change the hue and saturation of your grass to match the level of illumination in the space. Go to image > adjustments > hue & saturation
d. Holding down alt + drag the grass layer. This is a quick way of copying any object and making duplicate
layers.
e. Copy enough to establish a foreground layer of glass. Continuously use your transform tools and eraser tools to make it not so homogenous by rotating and softening in certain spots.
f. On your layer palette, click all the grass layers, right click in your layer palette and click merge layers.
g. Duplicate the layer and reduce the scale of the second layer.
h. Shift the layer below the foreground layer of glass and repeat the first steps of copying and filling that next layer of depth to the grass.
i. Use your clone stamp tool located in the tool bar to fix trouble areas.


3) Building
a. For this exercise, find a building with some repeating geometries
b. Crop it to a composition you prefer
using your polygonal lasso tool from your right-side toolbar. Use regulating lines on the building façade to establish your chunk of building. Select the portion of the building you wish to keep
c. Click ctrl + shift + I to inverse your selection
d. Click once with your background eraser tool
e. Click to allow editing of smart objects
f. Click your backspace key to delete the background
g. Go to edit > transform > perspective to establish a flat base for your building face. This will allow it to be edited easier as the bounding box of the transform tool will conform to shape of the object.
h. Go to edit > transform > perspective, again, to start manipulating building face to the vanishing points
i. Side tip: ctrl +t while still in perspective transform tool to change scale with same bounding box. Make sure you toggle back and forth without hitting enter.
j. On your building layer, open a layer mask
k. On your layer mask establish both the foreground and background colors in your toolbar as both black.
l. In your paintbrush tool, navigate in your brush settings on the top toolbar
and click the gear then select legacy brushes.
n. Under legacy brushes, click default brushes and locate the grass brush.
o. Use the slider to establish a proper size and begin to draw on the ground edge of the building while still in the layer mask
p. Reminder that in a layer mask, black means erase while white means show, this applies to black to white gradients and grays as well.


4) Populate
a. Using online resources such as skulgabbar, escalatina, mr
b. cutout, non-scandinavia and many others, download png images of people and trees to populate your space with.
c. Go to file > place embedded to place the people in. Make sure to change their scale based on depth and
use the horizon line to establish eye height for the other subjects.
d. By the subjects base, use a layer mask as explained above to ground the people to the scene
5) Give it shadow
a. Start by using alt + drag to establish a copy of the object you want shadow
b. Go to edit > transform > flip vertical to mirror the image and move it to place
them touching each other
c. In your tool bar, turn on your quick select tool and swipe to select the copied object
d. Go to edit > fill > black
e. Deselect the object by using ctrl + D
f. Make sure the shadow layer is below the subject layer in your layer palette by dragging the layers up and down
g. Go to filter > blur > gaussian blur to make the edges of the shadow a little hazy. I wouldn’t go more than a couple
of pixels
h. Go to edit > transform > skew. This will help you track the angle of the sun with the shadow.
i. Without pressing enter, press ctrl + T to fix the scale and proportion of the shadow. Hold down shift so the object can be transformed disproportionately. This will make the shadows a more realistic length.
j. Perform the same layer mask and grass brush combo to ground the
shadows
k. Make sure to lower opacity as well on the shadows by your layer palette 


