Topic_01: Getting Started/Interface

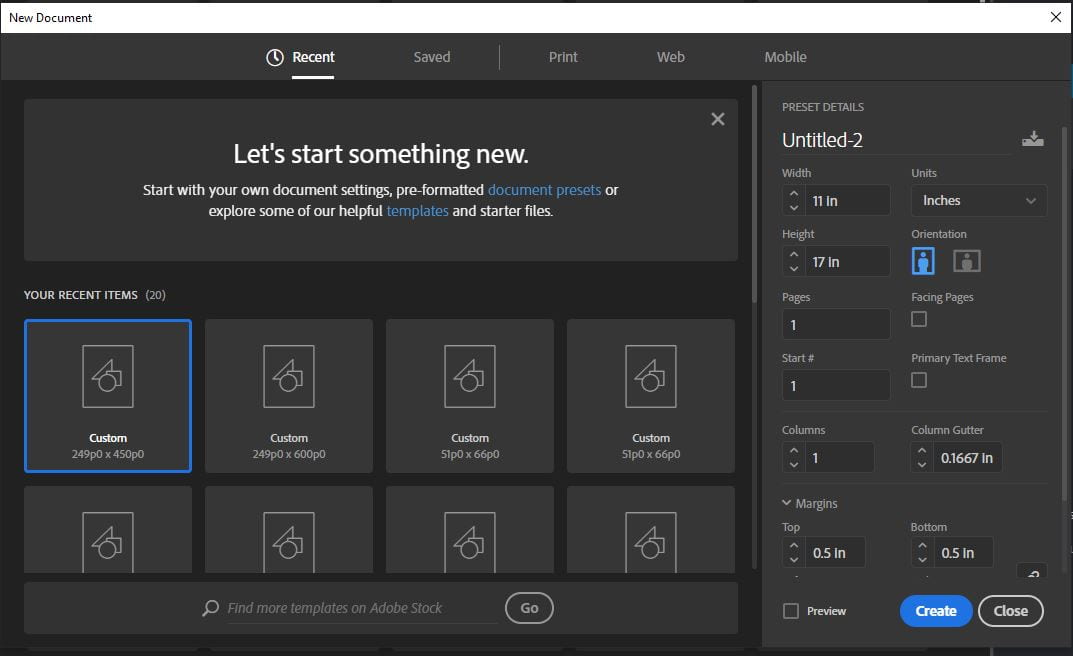
- File>New>Document (a window appears, these are your document presets)
- In the Page Size category ensure the correct size is set (i.e. 11×17, 8.5×11) or manually enter a custom size in the Width/Height boxes.
- In the Margins category by default the Inside margin distance should be set to 0.5 inches. You can also enter new values for a more custom fit.
4.Click OK (Ctrl+R/Command+R to show rulers!)
*****
- Locate the Rectangle tool
 on the left hand toolbar. (Click and hold for additional shape options)
 - Next, click once on the canvas and a dialog box should appear. You will be prompted to enter the width and height of the rectangle, click OK
Note****If you would like to change the dimensions afterwards, simply select the rectangle on the canvas, and in the top left corner of the InDesign window you’ll see four drop down menus for changing the x/y coordinates (don’t worry too much about this) as well as inputs for the height and width (h and w). You can enter new dimensions here while your rectangle is selected. Chain-link icon locks proportions.
- Ensure your layers tab is open (should be on right-hand side of screen) and if it isn’t load by navigating to Window>Layers. Keep track of your layers!!! Layers are important in case you haven’t noticed.
- Selection tool vs Direct Selection work exactly as they do in Illustrator.
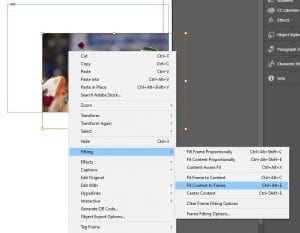
- To place image go to File>Place (Ctrl+D/Cmmd+D) and select an image from your hard drive.
- When you place an image into a document, InDesign automatically converts it to a clipping mask (Just by default set to a rectangle). Double clicking the image allows you to change the size of the image behind the mask.
- Right click over the image and select Fitting from the drop-down menu. Next select “Fit content to frame”

Topic 02: Stroke/Type
- On the left hand toolbar locate the Text tool
 . Click and hold on the canvas to create a bounding box for your text.
 - Open the Character toolbar by navigating to Window>Type & Tables>Character
- Type something inside the text box. Next select the text (Not the box). In the Character window navigate through different text styles. Underneath the first drop down there is a second drop down that indicates the a sub style (Bold, Italic, Condensed, etc. varies depending on font style, some have more, others none)
- The remaining 8 drop down menus control the Font Size, Kerning, Vertical Scale, Baseline Shift, Leading, Tracking, Horizontal Scale, Skew. Adjust these to create a more custom font (Subtext/Text Tag). Adds a nice touch.

- Access the Stroke panel through Window>Stroke. Can adjust the strokes of boxes similarly to Illustrator


Topic 03: Exporting/Packaging Files
- To save an output version of your file simply navigate to File>Export. Under Format ensure that the format is set to “PDF Print” or “JPEG” if you will upload to the blog. Specify a file name and location and click Save
- File>Package creates a packaged InDesign folder complete with all referenced link (artwork) as well as texts, etc. Can be extremely useful while working in a team and trying to coordinate keeping things in one location.
