This page contains a suggested workflow for dealing with video and audio files after you have recorded them. These are what we consider to be best practices for backing up and managing your raw media files from a camera or audio recorder.
Note: click on any image to enlarge.
DEALING WITH AVCHD FILES
Both the Canon Vixias and the Canon C100 shoot in the AVCHD, which has a specific workflow. We will detail working with the Canon 60D files below.
Once you have that day’s shoot, you need to transfer the files from your SD card to your portable external drive. We also STRONGLY recommend that, if you have a desktop hard drive or second external drive, you back up these files in case you have issues with your primary external drive. It is always recommended that you store raw video/audio files in two places: 1) an external hard drive that you edit from, and 2) a desktop drive that serves as an archive of those files.
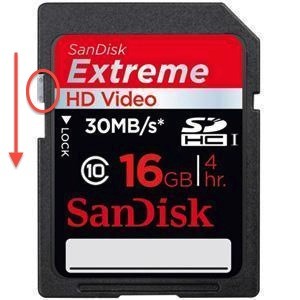
1. Before inserting your SD card into a computer or card reader, slide the little switch on the left side of the card to LOCK. This will turn your card into a “read-only” device, which means nothing can be recorded onto it or erased from it. This is a precautionary measure to avoid accidental erasure due to user error or a corrupted SD card.
2. Insert the SD card into the computer/machine. When the drive image appears on the desktop (it will be titled CANON), double click on it to open it in the Finder.  The Finder window will look like this. Note the Private Folder. The file containing all your video files is the AVCHD file.
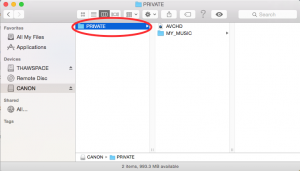
Now, plug your external hard drive into the computer. When the drive image appears on the desktop (note that it will appear with the name you gave it during formatting), double click it to open it in the Finder. The Finder window will look like this.
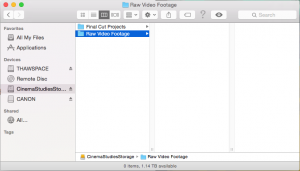
Note that there are two folders that I made here. One is called Final Cut Projects, which is where I will save and store my FCPX Libraries. The other is called Raw Video Footage, which is where I will transfer video files from my SD card to. Note that these are suggested names, but file organization is a major component of video editing. Be as organized as possible. Now, open the Raw Video Footage folder and create a new folder inside of it by either holding down the control button on the mouse AND clicking the mouse and select New Folder, or by using the little gear dropdown in the Finder and select New Folder. 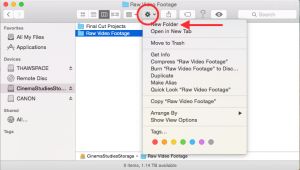 Click on the new “untitled folder” and give it the name of the project you filmed video for. Inside of the Raw Video Footage you should have a folder for every project you have video for or are working on. For the purposes of this tutorial, I will name it Media Workflow.
Now inside the project folder I will end up creating numerous folders for every shoot or day or card. This is so, say I have three shoot days for the Media Workflow project, the video footage from each of those days will be in its own folder and I can find it easily instead of putting all three days into one folder. For this tutorial, I’m going to name this folder Shoot One. Now, the folder structure will look like this: 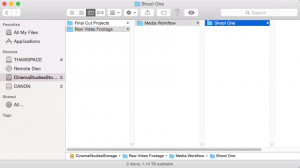
Now with the Finder windows for your external drive AND your SD card open, drag the PRIVATE folder from your SD card into the project/shoot day folder, in this case titled Shoot One.  The amount of time it takes to transfer the PRIVATE folder will be determined by how much footage you have.
Congratulations!!! You have transferred AVCHD files to your external drive. You are now able to import into FCPX. When you eject your SD card you will need to unlock the switch (from step 2 above) so that you can write video/audio to it again. If you’re out on your next shoot and you cannot record, this is likely why.
Remember, if you have a desktop drive for backing up and archiving, make sure to backup your footage there as well using the same folder structure.
A LITTLE NOTE ON AVCHD FILES
First off, please review our Video Recording Standards page to understand a bit more about codecs and formats/wrappers. Also, we recommend that you transfer your files to your external drive and view/log from it instead of doing it from the SD card.
You may have noticed that when you open the PRIVATE folder (either from the SD card or your external) all you see is an AVCHD file and other folders with format info. There are two ways to view the movie files contained in the AVCHD file. We will review both in case you have an issue with one method.
The Easy Way
Before proceeding, do note that you do NOT want to move or rename any of these files. FCPX and other editing software rely on the data structure of the PRIVATE folder to transcode files.
To view AVCHD files for logging, or for preview before import/ingestion:
Double click on the SD card image on the desktop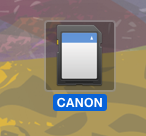
When the Finder window pops up, double click on the Private folder icon and then double click the AVCHD file icon. When you do, a window will pop up containing all the individual files. Hold down the command key and click the mouse on movie files you would like to view and then press OK. They will open in individual windows in Quicktime and you can re-save them as individual .mov files for later importing and organization.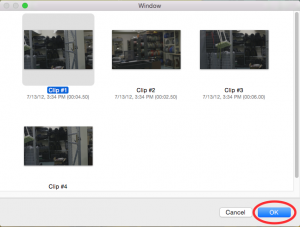
The Hard Way
Sometimes, when you double click on the AVCHD file icon you may get an error message that reads “The operation could not be completed.” Don’t worry, your files are there. However, due to proprietary reasons Quicktime player cannot read the AVCHD file that contains all of your video files at .MTS files; OR, you are using a Mac with an older operating system.
Before proceeding, do note that you do NOT want to move or rename any of these files. FCPX and other editing software rely on the data structure of the PRIVATE folder to transcode files.
To view AVCHD files for logging, or preview be before import/ingestion:
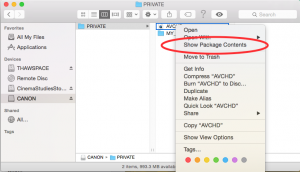
- In the Finder window press the control button and click the mouse on the AVCHD file. This is the same as right clicking and will open a contextual menu with options for that file. Now select Show Package Contents from the menu.
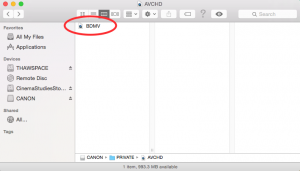
- No you should see a BDMV file. Again, press the control button and click the mouse on the BDMV file. Now select Show Package Contents
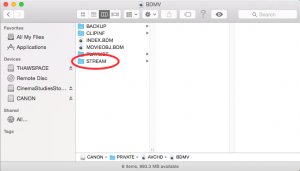
- Now you will have a series of files and folders. You will find all of your video files in the STREAM folder. All of the other files and folders are important to the structure of the PRIVATE folder, which is why you need to transfer PRIVATE folders for each shoot.
- By opening the STREAM folder you can play back your video files and log the footage. Remember DO NOT move them or rename them (if you do, we will have to take extra steps to make the files work in FCPX).
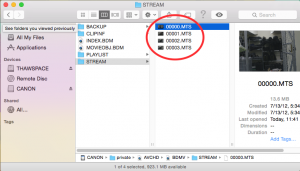
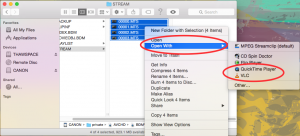
- These files are .MTS files. If you double click on them, you may not have luck viewing the files since the default application may not be the correct one. To view, select the files you would like to view and hold down the control button and click the mouse on the files. When the window pops up move the mouse over Open With, and select either Quicktime Player or VLC and the files will open (in VLC as a playlist and in Quicktime Player as windows). Note: once you have highlighted the files you would like to view you can also drag and drop them onto the VLC or Quicktime Player icons in the dock and they will open.
 If you do not see Quicktime or VLC in the dock, do a Spotlight search for them and then double click either of the icons that looks like this to open the application:
DEALING WITH .mov FILES:
The Canon 60Ds shoot in the H.264 codec and .MOV format, which has a bit of a different (and easier) workflow than AVCHD files.
- Once you have filmed you need to transfer the files from your SD card to your portable external drive. We also STRONGLY recommend that, if you have a desktop hard drive, you back up these files in case you have issues with your external drive. It’s always recommended that you store raw video/audio files in two places: 1) on an external hard drive that you edit from and 2) a desktop drive that serves as an archive of those files.
- Before placing your SD card in the back of the Macs in the Lab or into a card reader, slide the little switch on the side of the card to LOCK. This will turn your card into a “read only” device, which means nothing can be recorded onto it or erased from it. This is a precautionary measure to avoid accidental erasure due to user error or a corrupted SD card.
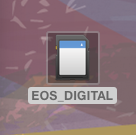
- Place the SD card into the computer/machine. When the drive image appears on the desktop (it will be titled EOS_DIGITAL), double click on it to open it in the Finder.
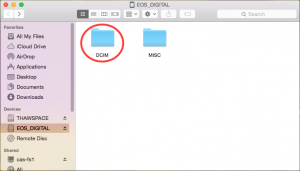
- The Finder window will look like this. To access your video files, double click on the DCIM folder.
- Now double click on the 100 Canon folder.
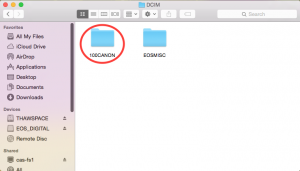
- Inside of the 100 Canon folder you will find your video files. Note the .MOV file extension.
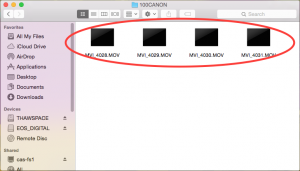
- Now, with the Finder window open showing your .MOV files, plug your external hard drive into the computer. When the drive image appears on the desktop (note that it will appear with the name you gave it during formatting), double click it to open it in the Finder.
 The Finder window will look like this.
- Note that there are two folders that I made here. One is called Final Cut Projects, which is where I will save and store my FCPX Libraries. The other is called Raw Video Footage, which is where I will transfer video files from my SD card to. Note that these are suggested names, but file organization is a major component of video editing. Be as organized as possible. Now, open the Raw Video Footage folder and create a new folder inside of it by either holding down the control button on the mouse AND clicking the mouse and select New Folder, or by using the little gear dropdown in the Finder and select New Folder.
 Click on the new “untitled folder” and give it the name of the project you filmed video for. Inside of the Raw Video Footage you should have a folder for every project you have video for or are working on. For the purposes of this tutorial, I will name it Media Workflow.
 - Now inside the project folder I will end up creating numerous folders for every shoot or day or card. This is so, say I have three shoot days for the Media Workflow project, the video footage from each of those days will be in its own folder and I can find it easily instead of putting all three days into one folder. For this tutorial, I’m going to name this folder Shoot One. Now, the folder structure will look like this:

- Now with the Finder windows for your external drive AND your SD card open, drag the the .MOV files from your SD card into the project/shoot day folder, in this case titled Shoot One.
 Congratulations!!! You have transferred H.264 files to your external drive. You are now able to import into FCPX. When you eject your SD card you will need to unlock the switch (from step 2 above) so that you can write video/audio to it again. If you’re out on your next shoot and you cannot record, this is likely why.
- Remember, if you have a desktop drive for backing up and archiving, make sure to backup your footage there as well using the same folder structure.
A LITTLE NOTE ON H.264 FILES
First off, please review our Video Recording Standards page to understand a bit more about codecs and formats/wrappers. Also, we recommend that you transfer your files to your external drive and view/log from it instead of doing it from the SD card.
The workflow for viewing and archiving AVCHD files, as you can see, is a bit laborious. However, with Macs and FCPX, you will find H.264/.MOV files or .MP4 files much easier to deal with. In fact, unlike AVCHD files, you CAN move or rename these files; HOWEVER, you will still have to transcode these into Apple ProRes 422 codec to edit efficiently in FCPX.
To view and log files shot on the 60D simply open up the 100 CANON folder to reveal your .MOV files. You can open these in Quicktime Player by double clicking any file. You can also select multiple files and a) drag and drop them onto the Quicktime Player application icon in the Dock or b) select the files, and hold down the control button and click the mouse on them (a right click), Open With, and then select Quicktime Player or VLC.
DEALING WITH WAV AUDIO FILES FROM THE H4N:
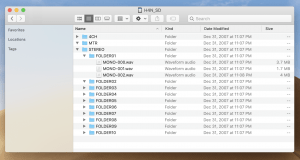
- Your audio files are probably in STEREO > FOLDER01.
- Copy files from SD card to hard drive.
- Import to editing software.
This page was written by André Sirois for the University of Oregon Cinema Studies Program and is published under Creative Commons license (CC BY NC SA 3.0)

