Cinema Studies has a 20 Computer Mac Lab housed on the 2nd floor of the Knight Library.
The macs in the lab all have the Catalina OS installed. All of the computers have 4 USB ports, 2 Thunderbolt ports, and 1 SD Card slot. ***The computers DO NOT have Firewire ports or internal DVD drives. A few external DVD drives are available to checkout from the lab monitor during open lab.
Below are several tips and techniques that will help you in using the Mac OS more effectively.
***All images can be enlarged by clicking on them.
- Finder Navigation and Views:
- Finder Windows and Folders: Finder Windows are how you view, open, or modify files and folders. You can open a new Finder Window by typing ⌘N when you are working in the Finder. In a Finder Window you can create new folders by typing ⌘⇧N or clicking on the gear button on the top of the Finder Window.

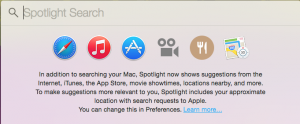
- Spotlight: The spotlight can be reached in the top right of the Top Menu or by using the keyboard shortcut ⌘Space Bar. This is a very effective way to search for a file or application on the computer. Click on the magnifying glass in the top right corner of the computer to activate the spotlight feature.
- Finder Views: There are four different views that can be accessed in the top toolbar of any Finder Window. Other options, such as list columns or calculation of file sizes, can be found in View Options (⌘J).

- Icon – This allows you to see files and folders as large icons. You can reorganize them manually in this view.
- List – This shows all files and folders in the specified location in a list. Meta data such as data modified, kind, or size can be used to sort and organize the files.
- In list view you can further modify what columns you can see in the view options

- In list view you can further modify what columns you can see in the view options
- Column – This view will automatically sort files and folders alphabetically and will you to see nested folder structures.
- Gallery – This will allow you to see large preview images of all files.
- Dock: The dock is unique to your login and the applications that are on it can be modified with the ones you use most frequently. You can also hide your dock or change its location by right clicking (or control clicking) on the vertical line on the right side of the dock.

- Favorites: Favorites are located on the side bar in every finder window. The defaults are shown in the image below, but they can be modified by dragging with your frequent folder locations like documents, downloads, movies etc.

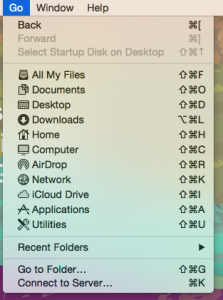
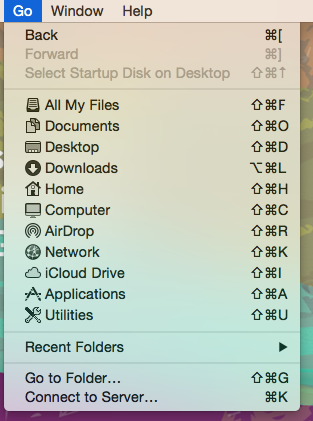
- Go Menu: Go to many common file locations such as Downloads, Home, Computer etc.
- An additional command in the Go Menu is Connect to Server which allows you to login to specific file servers (often setup for specific classes) that you have access to.
- An additional command in the Go Menu is Connect to Server which allows you to login to specific file servers (often setup for specific classes) that you have access to.
- Finder Windows and Folders: Finder Windows are how you view, open, or modify files and folders. You can open a new Finder Window by typing ⌘N when you are working in the Finder. In a Finder Window you can create new folders by typing ⌘⇧N or clicking on the gear button on the top of the Finder Window.
- Keyboard Modifier Keys: These modifier keys when held down while pushing other keys allow you to access many keyboard shortcuts, some of which work in many programs. The names of the keys are listed below along with their symbols. You can find lists of keyboard shortcuts and modifier keys in System Preferences and in the Menus on the top of the screen. For instance Command Z (Undo) is listed as ⌘Z.
- Shift: ⇧
- Command: ⌘
- Option: ⌥
- Control: ⌃
- Mouse Right Click – By holding Control while you click with the mouse it will act the same as a right click.
- Escape: ⎋
- Common Keyboard Shortcuts: The below shortcuts work in all programs and are very helpful to effectively navigate programs in the OS. Always be on the look out for new shortcuts for common commands.
- Hide: ⌘H
- Select All: ⌘A
- Cut: ⌘X
- Copy: ⌘C
- Paste: ⌘V
- Save: ⌘S
- Print: ⌘P
- Open: ⌘O
- New: ⌘N
- Switch Programs: ⌘Tab
- With the Application Switcher open while holding down ⌘ you can hit Tab or ` to toggle through the open programs.
- Switch Windows within a Program: ⌘`
- Force Quit: ⌥⌘⎋
- Log Out: ⌘⇧Q
- Screen Shots: ⌘⇧3 for full screen or ⌘⇧4 for a selection. Screen shots are saved to desktop as png image files.
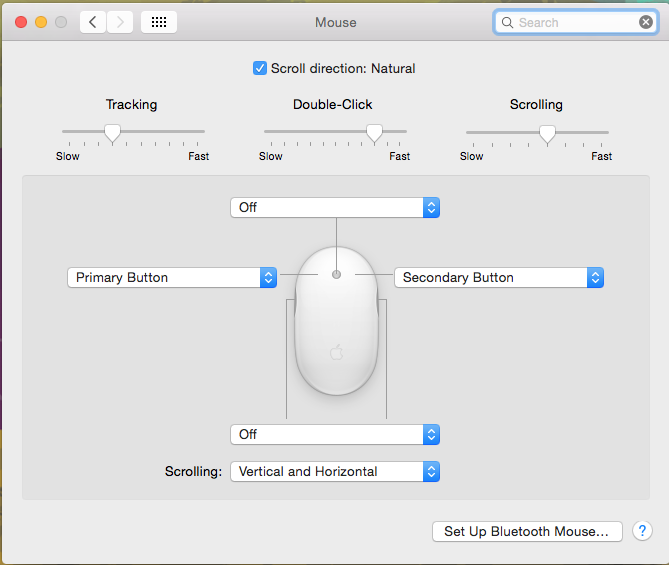
- Helpful System Preferences: System Preferences can be found in the top left “Apple” menu. Two specific preferences are highlighted below, but there are many others that can help with accessibility, finder features, and other short cuts.
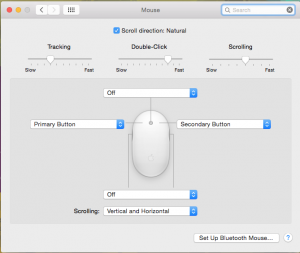
- Mouse – The mouse preferences can be adjusted to turn on and off the right or secondary click feature. You can also adjust clicking speed and the scrolling direction.
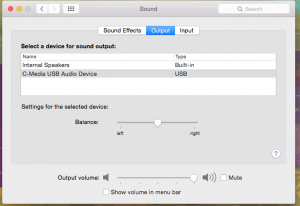
- Sound – The sound preferences allow you to adjust the volume level and to adjust which port the sound is output through. .
- Mouse – The mouse preferences can be adjusted to turn on and off the right or secondary click feature. You can also adjust clicking speed and the scrolling direction.


This page was written by Kevin May for the University of Oregon Cinema Studies Program and is published under Creative Commons license (CC BY NC SA 3.0)