The following instructions are for formatting new external hard drives or thumb drives. Please note that some drives come pre-formatted for Mac or Windows, but you should know how to format drives as certain formats will work best in certain situations and workflows.
IMPORTANT NOTE: FORMATTING DRIVES ERASES ALL DATA ON THEM
Note: Click on any image to enlarge.
STEPS FOR FORMATTING FOR MAC
1. Plug your drive into the computer’s USB/Thunderbolt port.
2. In the Spotlight Search or in the Finder type in Disk Utility (for directions on using Spotlight Search or Finder, please see this page) and double click on it to open the application. This is what the icon will look like:
3. In the left hand column, find the name of your drive and select it (it will usually be named as the brand name of the drive, so LaCie, Seagate, G-Raid, etc.).
4. Go to the Erase tab. For Format Type, please select Mac OS Extended (Journaled). You will want to enter a name, which will give your drive a name (you may want to use your last name, nickname, etc.). For this tutorial the name is Format Tutorial. Once you have done this, in the lower right corner click the Erase button.
Congratulations! Your drive is formatted. It will take a minute to format the drive, but once it’s done, the icon for it will appear with the name you gave it.
PARTITIONING
In some instances you may want to partition your hard drive. Partitioning a drive is when you divide the total storage of a drive into different pieces. These pieces are called partitions. For instance, you may want to divide 250GB of your 500GB hard drive to video editing projects, and the other 250GB to storing video and audio files. You may also divide your drive into a Mac OS partition and a Windows partition so you can use it on different platforms effectively.
Note: While it is always best to partition a recently formatted drive that has no data on it, you can still partition only the free space on a drive that has other content on it.
1. Whenever using Disk Utility, back up all important data.
2. Repeat steps 1-3 from the section above.
3. Make sure to select the top level of your drive from the lefthand column, and then select the Partition tab.
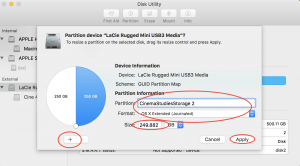
4. To add a partition, click the + button. You can then manually type in a size in GBs or TBs to adjust the selection. For this tutorial, we will create two partitions.
5. Once you have created the partitions, you will want to name them, select the format type, and then designate the size. For this tutorial we will create partitions named CinemaStudiesStorage and CinemaStudiesStorage 2, both formatted as Mac OS Extended (Journaled), and 250GB each. To select and change the details of the partitions, click on the box under Partition Layout and it will highlight the partition with a blue outline. When done, click Apply.
Congratulations! Your drive is formatted and partitioned. Now when you plug in your drive or look for it in Finder it will appear with two icons representing both partitions.
PARTITIONING AND FORMATTING FOR MAC AND WINDOWS
A common situation for many students is that they have a computer at home that runs the Windows operating system, but our lab uses the Mac OS. They would like to use the same external drive at home and at school, and so will need to partition it.
Note: A drive formatted only for Mac will not work on a Windows machine. If you want to use a drive on both a Mac and Windows, please make sure that you purchase a drive that can be formatted for both operating systems. For more information on this, please see this page.
1. Repeat steps 1-3 above for partitioning and formatting.
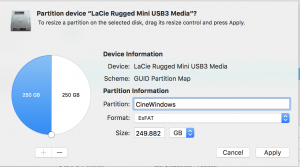
2. In this example, partition 1 will be called CINEMac, formatted as Mac OS Extended (Journaled) and 250GB in size. For the Windows-formatted partition, it will be called CINEWindows, formatted as ExFAT and 250GB in size. (Both ExFAT and MS-DOS (FAT) are Windows formats, but MS-DOS (FAT) will ONLY work for files under 4GB, so select ExFAT.) After making these selections, click Apply. 
Congratulations! Your drive is formatted and partitioned for both Mac and Windows.
RE-FORMATTING A DRIVE
Sometimes students have a drive with data on it, but would like to reformat it to work with multiple operating systems. In this instance, please talk to your instructor first. Cinema Studies can provide assistance in this process.
A common situation for students is that they have a Windows machine at home, and their drive is formatted for Windows, but they would like to use the drive both at home and in class on the Macs. In this instance, they would need to re-format and create a Mac OS Extended (Journaled) partition and an ExFAT partition. Doing this would erase all the data on the drive, which may include their music, photos, etc.
Here are the basic steps for this:
- Transfer and back up the data from the drive you wish to re-format and partition onto a personal machine or another external drive. Kevin May or André Sirois may need do this for you, and, depending on how much data you have, it could be an overnight process. You could also ask to borrow a hard drive from Cinema Studies to use during your class period.
- Format and partition your drive using the tutorials above.
- Transfer all the backed-up data that you want to access from your Windows machine onto the drive formatted/partitioned as ExFAT. The data that you will use in the Cinema Studies lab for class will then go on the Mac OS Extended (Journaled) partition.
- If you are unsure about this process, please speak with your instructor.
This page was written by André Sirois for the University of Oregon Cinema Studies Department and is published under Creative Commons license (CC BY NC SA 3.0).


