Category: Google Earth

Adding Images, Video, Links, Documents, etc.

A note about images in Google Earth – Google Earth only allows images to be embedded in a place-mark if they are already online.

If you need help with this, please contact Professor Mondloch or tech consultant Sean Sharp at ssharp@uoregon.edu. We will come up with a reasonable solution for this limitation. 

This means that if you have images that you want to use, you’ll need to post them online somewhere first, such as Flickr, or a UO Blogs page. Once they are online, then the images URL is used to embed them into a Google Earth place-mark.

How to add content to your Placemark:

When you are creating the Placemark, the placemark description box will show up with many choices to add information (see screenshot below): Name, description, colors, etc. etc.

There are also two buttons, one for “Add Image” and one for “Add Link.” When you click on the “Add Image” button you get a field that says, “Image URL,”where you place a URL which points to the location of the image that is already online. Important: images can only be added if they are placed somewhere online, such as Flickr, or even your own WordPress site (such as a UO Blogs site that you’ve created). 

When you click on the “Add Link” button you’ll see a field that says, “Link URL” where you put the hyperlink to the content that is online. This content can be an article in Wikipedia, a related journal article or even a .pdf file that is being hosted online.

For detailed information on annotating within Google Earth, see this page (It will open in a new tab).

The main text box is where you will add textual information about the placemark. You can use HTML in your text

The screenshot is below. Click to enlarge.


Saving a .KML or .KMZ file

In order to save your work in Google Earth, you’ll need to save the file as either a .kml file or a .kmz file. The difference is that .kmz files are “zippped” with a compression algorithm that allows you to include more stuff (places, tours, etc.) within the file. It will generally create a smaller file, too, which is helpful for sending as an email attachment.

To get started, you’ll need to go to the left sidebar in Google Earth and select the folder or item that you want to export and save. Once it is selected, then right-click (or on a Mac, “command-click”) and then choose “Save As . . .”

You’ll then be presented with a dialogue box allowing you to choose the file type (.kml or .kmz) and the location.

Set those and click on the Save button.

You’re done!

Images:


Getting Started

Welcome to the Getting Started Section. Below you will see how to install Google Earth and how to get started using it.

The other tabs teach you other aspects of Google Earth, such as how to add place marks, polygons, how to create a narrated tour, and a path.


Getting started with Google Earth:

Installing Google Earth:

If you’d like to install or upgrade to the latest version of Google Earth, you can download Google Earth here.

If you experience issues installing Google Earth through the Google Updater, you can directly download the latest version of Google Earth here:

To install Google Earth to a PC:

  1. Download the latest version of Google Earth from the following location:

    http://dl.google.com/earth/client/current/GoogleEarthWin.exe

  2. Double-click the file and go through the installation process
  3. You should now be able to run Google Earth by going to Start > Programs > Google Earth and clicking on the Google Earth icon.

To install Google Earth to a Mac:

  1. Double-click the .dmg file from your Downloads folder. A new folder will open with a Google Earth icon.
  2. Drag this Google Earth icon into your Applications folder.
  3. You should now be able to run Google Earth by clicking on the Earth icon from your Applications folder. If you’d like you may also drag the Earth icon to your dock for easier access.

If you have any problems installing, see the Installation errors section of this article.


Saving your work in Google Earth:

To save your places within Google Earth to either a .KML or a .KMZ file, choose the place, tour within the “Places” column in the left and right-click. Then choose, “Save As . . ” from the menu and choose the file format you prefer. .KML files generally work well for anything you’d like to save.

Paths and Tours

OPTIONAL:

How to create a fly-over “tour” of points within Google Earth [note: the “how to create a tour” begins approx. 4:50 into the video]:

Polygons

Here’s a tutorial on how to add Polygons to your maps within Google Earth (this allows you to call attention and highlight a particular area, such as a region or country):

Placemarks

This tutorial describes how to add place marks to geographical locations within Google Earth:

Text instructions are here:

Follow the instructions

Position the 3D viewer to contain the spot you want to placemark. Consider zooming into the best viewing level for the desired location. Choose any one of the following methods:
Select Placemark from the ‘Add’ Menu.
Click the Placemark icon on the toolbar menu at the the top of the screen
Pushpin icon
The ‘New Placemark’ dialog box appears and a ‘New Placemark’ icon is centered in the viewer inside a flashing yellow square. Position the placemark. To do this, position the cursor on the placemark until the cursor changes to a pointing finger and drag it to the desired location. The cursor changes to a finger pointing icon to indicate that you can move the placemark.

Position the placemark

You can also lock the placemark position or set advanced coordinates for its position. Set the following properties for the new placemark:
Name for the placemark
Description, including HTML text (see Writing Descriptions)
Style, Color – Choose a color, scale (size) and opacity for the placemark icon
View – Choose a position for the placemark. For explanation of terms in this tab, mouse over each field. Click Snapshot current view to apply the current view (altitude and camera angle) to this placemark.
Altitude – Choose the height of the placemark as it appears over terrain with a numeric value or the slider. Choose ‘Extend to ground’ to show the placemark attached to a line anchored to the ground.
(Icon) – Click the icon for the placemark (top right corner of the dialog box) to choose an alternate icon.
To learn more about editing properties for your placemark, see Repositioning Placemark

Click OK to apply the information you entered in the placemark dialog box.
Your placemark appears in the 3D viewer and as an entry in the selected folder. Once you save this placemark, you can always change its position and properties. See Editing Places and Folder for more information.

Once your placemarks are organized in a folder, it is easy to make tours and movies.


Next is how to add content to your Placemark. When you are creating the Placemark, a box will show up with many choices to add information: Name, description, colors, etc. etc.

There are also two buttons, one for “Add Image” and one for “Add Link.” When you click on the “Add Image” button you get a field that says, “Image URL,”where you place a URL which points to the location of the image that is already online. Important: images can only be added if they are placed somewhere online, such as Flickr, or even your own WordPress site (such as a UO Blogs site that you’ve created). 

When you click on the “Add Link” button you’ll see a field that says, “Link URL” where you put the hyperlink to the content that is online. This content can be an article in Wikipedia, a related journal article or even a .pdf file that is being hosted online.

For detailed information on annotating within Google Earth, see this page (It will open in a new tab).

The screenshot is below. Click to enlarge.

Basics

An account on Google is not necessary to download and use Google Earth. However, an account on Google is necessary to use YouTube. You can create a new (non-primary identity) email account somewhere, such as Yahoo or Gmail, that you will only use for this class if you’d like. You can then use the Gmail account to login to YouTube. This will keep the courses communications and work in a separate place from your other work, if that is your preference.

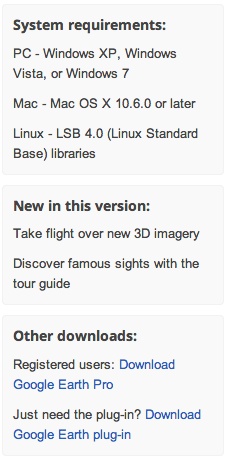
To download Google Earth, please go to:

http://www.google.com/earth/download/ge/agree.html

In addition, the requirements are as follows:


This is a video tutorial to introduce the basics of Google Earth.

http://www.google.com/earth/learn/beginner.html

This video tutorial goes over the basics of navigation within Google Earth.

Recording a Tour

Two ways to create “tours” in Google Earth:

Please note: There appears to be a bug in Google Earth during the recording of tours in which there is a time limit of about 3:30. In order to get around this, please make two tours for your projects, (or more) just make sure that they are not longer than 3:30. Thank you.