Formatting Large-Format Documents for Print
Large-Format Printing: Hints & Tips
Printing to large-format printers can sometimes be difficult and unpredictable. In the Output Room our goal is to make your printing experience as easy and stress free as possible. These hints and tips should help avoid some potential problems.
Tip #1 – Ask For Help. We may not have all the answers, but we can help. We have several documents that should help to successfully print using the Output Room services.
Tip #2 – Margins. Allow for the non-printable area in the margins. There is a 0.2 inch non-printable area along each side of the paper. So the maximum design space is 41.6 inches on 42-inch paper and 23.6 inches on 24- inch paper. Failure to take into account the non-printable area can cause undesirable results (shifting, clipping, scaling, and others).
Tip #3 – Avoid Long Documents. Unless your design centers on the need for a single long document, design your document as a series of panels. Larger files take more time to process. Long documents are more costly to re-print. With panels, only the problem panels will need to be reprinted. The longest we recommend for a single panel is 60 inches (by 41.6 inches).
Tip #4 – Save PDF files in the PDF/X format. [See Saving As PDF/X for instructions].
Saving files as PDF for printing insures the image and font information will be packaged within your file. Viewing the PDF at 100% may show some potential problems prior to printing such as missing or low-resolution images.
Tip #5 – Optimize Documents. Document size directly impacts processing time. Optimizing your document will result in faster printing. [See FAQ – Guide to Optimization].
Tip #6 – File Names. Use file names that uniquely identify your document. Adding your own name, as part of your file name, is a good place to start.
Tip #7 – Bring Your File With You. Especially true the first few times you print. Having your file with you when you come to print will allow us to address any potential problems immediately.
Tip #8 – Stay Nearby For A Preview. You are required to pay for documents you ask us to print. After getting an estimate of when your document should start printing, be available to view the document as it starts so you can cancel if it is not printing as intended.
Tip #9 – Customer Provided Paper. Customer provided paper requires different procedures. [See Using Custom Paper]. If you are providing your own paper, make sure you have extra in case there is a need to re-print.
Tip #10 – Unrealistic Expectations. The Output Room Operator is a gatekeeper and facilitator, releasing print jobs from the print server, collecting them, and delivering them to customers. The Output Room cannot guarantee a desired result.
The best way to achieve a desired result is to experiment and refine the process for your own needs. You are welcome to experiment using our equipment. Just remember you will be charged for any printing you ask us to perform. We will do our best to help you with any experimentation you wish to pay for.
Tip #11 – Printing is First Come, First Served. Be prepared for the wait time as others may also be printing. During peek periods of demand, like review week, you should submit documents at least 24 hours before they are due.
Tip #12 – Allow Plenty of Time. Large-format printing takes time (optimization, creating a PDF, correcting orientation, etc…). Make time for the possibility of a re-print. During peek periods of demand, like review week, you should submit documents at least 24 hours before they are due.
Large-Format Printing: Saving As PDF/X
To save as PDF/X using Adobe Creative Suite,
Open your document in the original Adobe product with which it was created (If using a non-Adobe product, first save your document as a PDF and then open the PDF in Adobe Illustrator).
You will be prompted to enter a file name and location for the PDF file to be created.
Be sure to select PDF as the file format from the format drop down list.
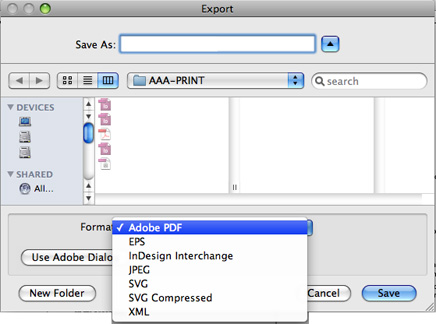
Click Save.
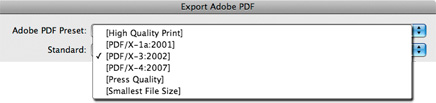
Another dialogue box should appear for selecting PDF format options.
From the Adobe PDF Preset drop down menu at the top of this dialogue box, choose PDF/X-3:2002.
- Illustrator
Click on button Save PDF. - Indesign
Click on button Export. - Photoshop
Click on button Save PDF.
For instructions for saving to PDF using other applications (such as PowerPoint, see our FAQ section).
Printing PowerPoint Posters
PowerPoint is not designed to do page layouts for print. It is designed for screen presentations. We recommend that you use software specifically designed for creating documents for print (such as Adobe InDesign). Ideally, the software should support the saving to a PDF file format. [download printable version]
Potential Problems Using PowerPoint
Problem #1 – Font Substitution. Installed fonts can be different from computer to computer and is especially true between Windows and Macintosh. Saving to PDF, the fonts you designed with are used when printing.
Problem #2 – Low resolution bit mapped images. Bit mapped images (usually photos or scanned images) are made of a collection of square dots. Enlarging these images enlarges the bits that make up the image. For low resolution images, the individual bits become visible when enlarged and the image will look like a bunch of small squares. Bit mapped images should be at least 100 dpi at the size that you intend to print, but do not need to exceed 150 dpi.
Problem #3 – Wrong document size. Create the poster at the size you intend to print it. Scaling a small document does NOT work.
Problem #4 – Microsoft graphic effects. When using PowerPoint to create posters all Microsoft graphic effects should be avoided. Many Microsoft graphic effects (drop shadow, glow, bevel, gradients, etc…) do not work well with a PDF workflow. As a result objects that include these effects will cause artifacts during printing (missing images, missing or distorted colors, layering problems, etc…).
If you do not have access to page layout software and need to use PowerPoint, save your document to a PDF format using these instructions.
Converting PowerPoint Slide to PDF
Create your layout in PowerPoint, version 2004 (MacOS), version 2003 (Windows) or newer.
WINDOWS
These instructions are for using Adobe Acrobat Professional*.
- Open your document in PowerPoint. From the Design tab click on Page Setup (in the upper left). Note the size of the slide. Click Ok.
- From the File tab select Print.
- From the printer list choose Adobe PDF and Click on Printer Properties.
- A new dialog box appears. Select the Adobe PDF Settings tab and under Default Settings select PDF/X3 2002.
- Under the Layout tab click Advanced.
- A new dialog box appears. Under the Paper Size drop down menu select Postscript Custom Page Size.
- A new dialog box appears. Enter your slide’s shortest dimension as the width, and its longest dimension as the length. Click OK.
- Click OK to exit Advanced settings. Click OK again to exit Printer Properties.
- Click on the Print icon in the upper left. A dialog box appears asking you to title your document and where to save it. Give your document a title. Choose location to save PDF. Click SAVE.
- See Poster Printing to submit file for printing.
MACINTOSH
These instructions are for using Adobe Acrobat Professional*.
- Open your document in PowerPoint. From the File menu select Page Setup
- Note the size of the slide and click Options… button.
- A new dialog box appears. From the Paper Size drop down menu select Manage Custom Sizes.
- A new dialog box appears. Click the plus icon in the lower left. In the Paper Size field enter your slide’s shortest dimension as the width, and its longest dimension as the length. Click OK.
- Double check your new custom page size is selected. Click Portrait or Landscape to match the orientation of your layout. Click OK. Click OK again to exit Page Setup.
- From the File menu select Print.
- From the PDF menu in the lower left select Save as Adobe PDF. A dialog box appears for PDF settings. Change the setting to PDF/X-3:2002.
- Title your document and choose where to save it.
- See Poster Printing to submit file for printing.
* If you do not have Adobe Acrobat Professional installed on your computer, there are computers available with Acrobat Pro installed at our facility in 280 Lawrence Hall.
Using Custom Paper
When providing your own paper for printing there are a few issues that you will want to be aware of. You should still take into consideration all the tips outlined in the “Hints & Tips” page. [download printable version]
Guide for Using Custom Paper
1 – All customer provided paper is at your own expense.
With the wide variety of media types it is impossible for us to know how different media might perform or what changes in workflow may be required. Therefore, you should approach printing on your own paper prepared for additional printing cost that may be required to produce the desired result.
2 – Media. Paper vs. Plastic.
Any fiber based material that will accept ink should work. Plastics (like mylar) or other material that will not accept ink needs to be specially treated to be usable on an inkjet printer.
Different types of media have different properties. If using a material for the first time you should consider doing some testing.
For media that has been specially treated for inkjet printing (i.e., printable mylar or glossy) please note to the A&AA Output Room operator which side should be used.
3 – Purchase extra media.
Custom paper is not part of our standard workflow. Adjustments may be necessary to complete your project. Be prepared for reprints that may be needed.
4 – Margins.
Allow for the minimum non-printable margins when designing. Failure to take into account the non-printable area can cause undesirable results (shifting, clipping, rotation, and others). See the chart for minimum margin settings.
Supported Paper Sizes
| Sheet | Roll | |
| Minimum Paper Width | 8.5 inches | 11 inches |
| Maximum Paper Width | 44 inches | 44 inches |
| Minimum Paper Length | 11 inches | 11 inches |
| Maximum Paper Length | 66 inches | – |
Minimum Margins
| Sheet | Roll | |
| Leading Edge | 0.20 inches | 0.20 inches |
| Trailing Edge | 0.67 inches | 0.20 inches |
| Side Edge | 0.20 inches | 0.20 inches |
5 – Sheet vs. Roll.
If the paper you are considering is available as a roll, consider leaving it as a roll rather than cutting sheets. As sheets, if there is a problem, the entire sheet must be tossed. As a roll, if a problem is noticed the print can be canceled and only the amount of paper before the problem is noticed will be wasted. Include an additional 8 inches of material, that will be trimmed, for each time the roll will be loaded into the printer.
6 – Paper to be loaded short edge first.
Portrait and landscape orientation in the page setup impacts how your document is oriented on the paper it will be printed on. It does not effect how the paper is oriented with respect to how the paper is inserted into the printer. When sending your document, the printer will assume the paper you have chosen is inserted “short-edge” first.